I just pulled off the biggest sewing challenge of my career to date. Together with my mom and my best friend, we sewed a gorgeous wedding dress for said best friend's little sister, who has been like a sister to me for most of my life. It was a wonderful, stressful, fun, and did I mention extremely stressful project. It came out great, but there were many challenges along the way. I feel it has improved my technique tremendously.
Ok, on to the sewing. First step was to pick out a pattern. D, the bride, wanted a dress that was sophisticated but not overly fancy, with a short/tea length hem, a-line skirt, and sweetheart neckline. She and her sister, M, went to the local Jo-Ann's to look at patterns. Unfortunately, they did not know to check
Pattern Review, and the first pattern they picked out (Vogue 2962) would have likely been an unmitigated disaster. The problem with this vintage pattern is that while the line drawing on the front looks lovely and chic, it generally seems to turn out frumpy and overly full of fabric. To be fair, M is a self-described 'cowboy seamstress' who is very good at adapting patterns and probably could have made it work. However, my mom had a pattern in her stash that hit all the bride's requirements and had excellent reviews online: Simplicity 1606. After seeing this pattern, it was clearly the perfect choice. We planned to sew view C (with a gauze and lace overlay) with an asymmetric hem.

Next up was picking the fabric. We live in the SF Bay Area, so we are blessed with some truly awesome fabric shops. We spent several weekends on this, going to
Britex in SF, and
Stonemountain and Daughter and
Lacis in Berkeley. We finally found the perfect fabric at Lacis, a doublesided silk satin that flowed like water and shone like moonlight. We also bought a fabric we thought would work for the overdress, a very, very sheer fabric called crepeline, and some beautiful silver lace motifs. D wanted lace that was not 'flowery', and we finally found this lace that, while it has flowers, also has leaves, with traces of silver and brown in the embroidery. We also ended up using some leftover silk organza and silk taffeta from my wedding dress, which my mother sewed, and buying some silk twill from
Dharma and some china silk from Stonemountain for the various linings. Horsehair braiding and lightweight boning we bought at Jo-Ann's and the wedding buttons and wedding loop we bought at Britex. I also bought some silk thread and, perhaps most importantly of all, Tulip Hiroshima brand silk pins and needles from
KimonoMomo, a fantastic local small business. Silk pins are the most amazing things ever, guys. You can pin silk, even the crazy silk satin, and not leave a mark! You can rip handstitching done with these needles and not leave a mark. I am so spoiled and am never using anything else ever again.
 |
| At Lacis, picking out the lace motifs! Me, D and M, photo taken by Mom. |
 |
Most of the fabrics: starting at top right, clockwise: silk satin, silk organza, crepeline, twill.
Also in picture, lace, bridal loop, silk ribbon and various weights of silk thread. |
Of course, we didn't start sewing right away on all this precious silk fabric, yikes. Three mockups were made before we even cut the silk.
Mockup #1: the Muslin
All important projects should always start with a muslin. After measuring D, we found the reason she always has trouble with regular department store clothing: like many people, she is three different sizes across the length of her body. To deal with this, we graded the pattern from size to size, using a ruler and a french curve. Then, using the graded pattern (which was traced onto
swedish tracing paper rather than cut from the paper pattern, I swear by this technique), I cut out the cheap cotton muslin I keep on hand for making first drafts of patterns.
 |
| Pattern Layout |
 |
| First draft of the underdress completed, hanging on Susannah |
Fitting the mockup on D went well. We still had to make a few adjustments to get it to fit perfectly, partially because I hadn't done the grading at exactly the right points, and also because the dress pattern is actually set up to give you lots of room to play with making alterations. I want to give the pattern kudos for having a very detailed fitting section! D's reaction was priceless. Even though this was still just a relatively poor fitting muslin, she was so happy with how well it fit her and told us it made her feel really good. Yay!
Mockup #2: The White Dress
For #2, I wanted to get further in to the construction of the dress, and practice working with slickery fabrics. I bought some cheap poly-silk and poly-gauze from Jo-Ann's, man that stuff was awful. Sewing the real silk was a dream in comparison. This dress would have the boning, bodice lining, the asymmetric skirt and the gauze overlay.
 |
| Poly-silk dress with gauze overlay |
The gauze overlay immediately began presenting some real challenges. I had to figure out how to make the seams sturdy, yet nearly invisible. The best compromise seemed to be a single thread seam, with a reinforcing zig-zag stitch over it. I was worried, but hoped that the crepeline and silk thread on the real dress would look better.


For the neckline, I wanted to stabilize and define the edge of the overlay, and decided to do so by sewing a narrow white silk ribbon into the seamline.
This worked pretty well, but just a little... less nice than we had hoped. We continued on, hoping it would look better on the real dress.
A big problem with the overlay became apparent when we put it on D to try on. The overlay is sewn with a princess seam, which is normally very flattering. However, on the double layered (had to be double layered in order a) to hem easily, and b) to have enough strength to support the lace appliques) semi-transparent cloth over skin, she suddenly had two bright white lines pointing at her armpits =/. Not happy with this, my mother, the most awesome seamstress I know, put her awesome math and engineering skills to the test (this lady has a PHD in physics as well as being a master seamstress and knitter) and worked out how to reverse engineer darts from a princess seam. I will write a separate blog post about this another time, it was really impressive.
 |
| The original bodice pieces |
 |
| That armpit pointing seam, ugh |
 |
| The new bodice with darts! No more armpit pointing! |
So now we have 16 darts to do, on transparent cloth. It's hard to see in the picture above, but doing darts the normal way, we now have 32 totally visible thread ends hanging out inside the bodice, ugh. Mom researched the situation online, and found an awesome solution: One thread darts. For a tutorial, go
here and
here. They are a little difficult to set up at first, but after the first several, I realized the trick is to always keep the knot on the thread spool. Yes, you'll waste some thread, but that's better than having to resew your dart! One thread darts are just what they sound like. Instead of having an upper and lower thread, you'll thread your bobbin thread through the needle, then reverse thread it through your machine and tie it to the upper spool thread. Wind the spool backwards so that the knot will stay on the spool - if it comes off it will likely come untied or get stuck in your machine. Pull the thread gently taut, and place the top of your dart under the needle, and slowly sew down. It will look so professional you won't even believe it.
Mockup #3: The Red Dress
The Red Dress was sewn to be a fully complete and wearable dress for D to wear to the wedding rehearsal and rehearsal dinner. She had originally really wanted to wear a red dress for her wedding, but family pressure, so we wanted to make her a fantastic red dress for the party at least! I had some incredible red cut velvet on hand, and hand-me-down from a friend of a friend who had stopped sewing. I have no idea what the fabric content is, but D loved it. This dress was sewn as view A, no overlay, with straps and a zipper, and the normal hemline. The only mod is to take the straps from a halter neck to straight back - lengthen slightly and tack in to fit and you're done. This is where Mom started really stepping in to help, and it really showed in the quality. Mom is very precise in her measuring and pinning, and basically was willing to play "sous-chef" to me throughout all the red dress and final white dress sewing.
 |
| The red dress! no lining yet and the straps are just laid on to show placement |
 |
| Zipper in! I bossed that thing :) |
This fabric was beautiful, but such a bitch to sew. The cut velvet makes for an uneven thickness - you can have no velvet, one velvet or two velvets in your stitch line, and every time it changes the fabric wants to wiggle and woggle on you. The only answer was, as ever, to PTSOOI it.
 |
| PTSOOI: Pin The Shit Out Of It |
 |
| Team work! |
Fitting time! It mostly fit great, but we found one important fit issue:
The way D's hips and waist are shaped, the dress bunched and created a fold at the hip. We were able to eventually correct for this by raising the bodice waistline 1/4 inch and raising the skirt up an additional 1/8 inch at the sides. The wrinkles in the side bodice were also a problem we managed to fix for the final dress, but using an underlining cut on the bias.
Here's the final dress at the after-rehearsal party! D looked gorgeous :)
 |
| Girl would not stand still! Also, was using my crappy cellphone camera. Still, she looked wonderful and loved the dress |
 |
| The happy couple! |
Notice how the bottom of the skirt hangs? It's very choppy. We were able to solve that for the wedding dress by stitching in a length of horsehair braiding that smoothed the line.
THE FINAL DRESS (cue dramatic music)
Ok, we've done the muslin, the second muslin and the wearable muslin! We're totally ready to start the real dress! And it's a whole six weeks before the wedding! I've done marathon sewing before, but oh my god, was this an endurance test. Basically every spare minute not at work was spent sewing. Honestly, we had a schedule and planned to be done much earlier, but... yeah, life never works that way. As it was, we finished the dress a full 3 days before the wedding. Rockstars. Yes.
Cutting the fabric
Not gonna lie, this step was painful and terrifying. Working with hideously expensive and delicate silk means that you are racked with knots of tension. What if I screw up? Beyond that... silk is jello. It wibbles. It wobbles. It never stays where you put it. Bias? Just kill me now.
 |
Iron, iron, iron, then iron some more. This is silk, so use a low setting and a
press cloth and iron on the wrong side. Never directly expose your fabric to the iron. |
Always cut your silk in a single layer. Mom and I, being the experienced and learned seamstresses we are, thought we could skip this step. We were completely wrong. I repeat, ONE LAYER. You will save yourself heartache and going back to fix things. Luckily, we started with the lining fabric and were able to fix all our mistakes without having to cut another piece. After that, we cut in all one layer.
 |
| We can do two layers, sure! |
 |
| hm, there's still some wibble, after so carefully aligning and pinning and pressing and realigning |
 |
| Maybe if we add some heavy weights to keep it in place? |
 |
| Arrgh so wobbly! |
 |
| God, we needed drinks after that. Dad made us sour plum margaritas! |
Cutting went better after that, until we got to the crepeline.
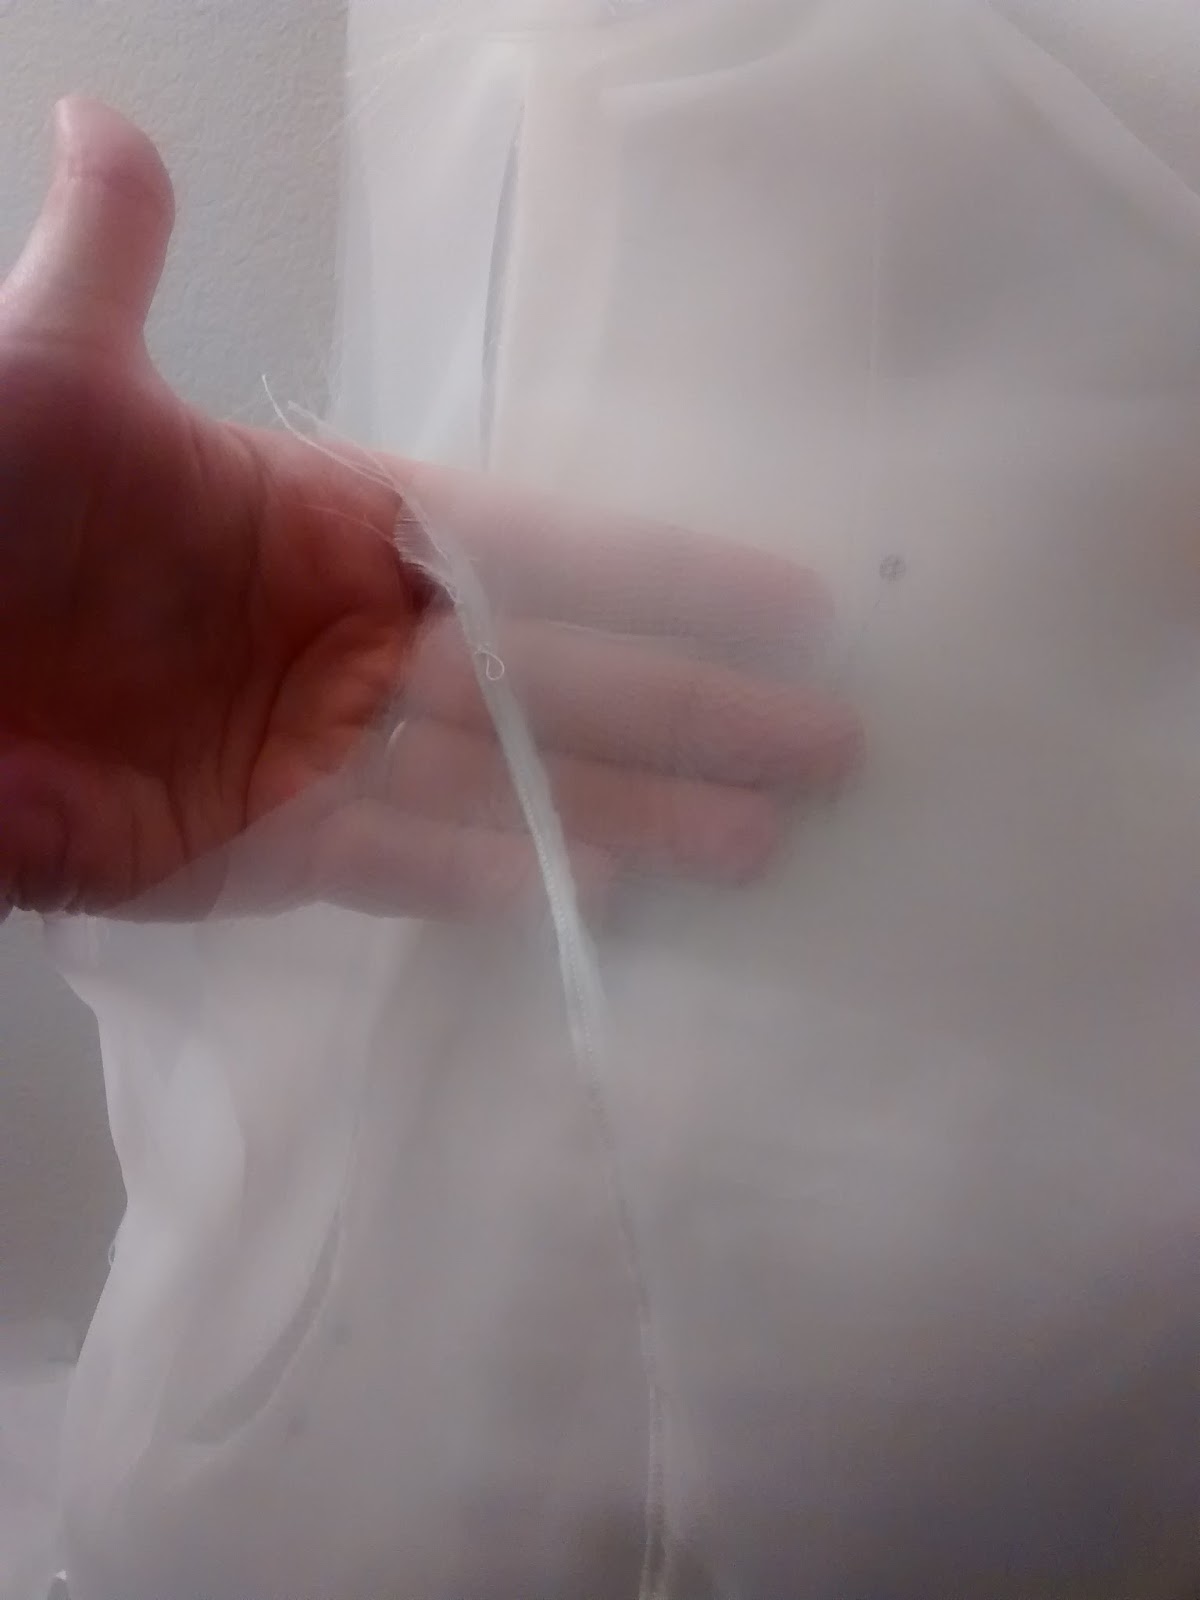
Crepeline
Crepeline is a very sheer gauze. It is most often used for the preservation of historical textiles. The silk satin shone through it almost as if it wasn't there. However, we had already noticed issues. It is so fine, we weren't sure it would hold up to having the lace. The plan at this point was to make the bodice a double layer with the bottom layer being the slightly thicker and sturdier silk organza, and to sew the skirt lace directly onto the satin and have the crepeline float over it. But when we got around to cutting... The crepeline flaws at the slightest touch. The weave is so loose and fine that even just touching it carefully is enough to introduce snags and tears. We realized almost instantly that there was no way D could actually wear this on her wedding day, getting hugs from friends and family, let alone being able to sew it without destroying it.
The overdress had got to go.
Luckily, when mom and I showed M and D, they both agreed. We would now sew the A view of the pattern, with no overdress, and make up a pattern for a pair of cap sleeves out of the organza. It was an expensive mistake in our planning, both in terms of time invested in the overdress pattern and in terms of material, but I'm glad we cut our losses when we did. The eventual A style dress showed off the beautiful satin and was way more elegant than we would have ever gotten the C overdress to be. I'm not really sure what we were thinking!
So, if you are thinking about using crepeline to sew a wedding dress, here is my advice: Don't do it.
Sewing the dress
Once we had our silk all cut and our direction cleared up, it was time to finally start sewing (now one month till the wedding! eek!). The silk sewed beautifully. I used a microtex needle, and did all the machine sewing on my mom's Janome. There was also a lot of hand sewing, done with the Hiroshima Tulip needles and a great deal of patience.
First, I did some practice on scraps, and made a test of the hemline - the silk satin, underlined with the silk twill, sewn in horsehair braid, lined with the china silk.
Next, we underlined each skirt piece with habotai/china silk. Underlining fabric gives it extra strength and stability, and helps it move well and hold its shape. The two pieces of fabric, satin and habotai, are sewn together around the edges, wrong sides together, and after that treated as a single piece of fabric.
We sewed the horse hair braid to the china silk underlining 1/8 inch above the hemline before we attached the underlining to the silk satin, so that the satin would lay perfectly smooth over the hem. Once the skirt pieces were fully constructed, we stitched 2 of the 3 skirt seams, leaving the right hand side seam open so that the skirt could lay flat for hand sewing the lace.
Handsewing the lace onto the skirt took nearly all of Labor Day Weekend. Luckily, hand embroidery is one of my main hobbies, so I'm pretty good at tiny, near invisible stitches. I used 100 weight silk thread and a fine embroidery Hiroshima needle. Mom and Dad gave up the use of their dining room table for the weekend so I could have my setup ready to go. I had to be able to get at the underside of the skirt easily, and we ended up laying it over the dining room table and the ironing board. I used multiple silk scraps to cover any part I wasn't actively sewing, to avoid getting oils or dirt on the fabric. Another benefit to this setup - I got to look up and watch hummingbirds visiting the flowers in Mom and Dad's backyard!
While I worked on the lace, my mother was hard at work sewing down all the seams. The satin, while intensely gorgeous, was the least willing fabric to take a crease I've ever worked with. God give me cotton! Mom had to hand sew down every single satin seam to get it to lay flat, being careful only to catch the underlining twill or habotai. Another thing we did on the bodice was to cut the underlining twill for the side bodice pieces on the bias. By doing so, we eliminated much of the side panel wrinkling that you can see in the red dress. Whichever way the fabric was pulled, there was one piece not being pulled on the bias, which greatly strengthened the fabric.
 |
| The difference the hand sewing made! |
I'm going to skip over the long process we went through designing cap sleeves and leave with the summary: they kinda worked, but looked kinda stupid and kept wanting to be wings, and then we realized we could straight up use the lace as the strap and gave ourselves another smack on the forehead.
 |
| D'oh! that's so much prettier! |
However, we realized that we didn't have quite enough lace to do both straps, so Mom headed back to Lacis to look for more. Bad news, they had completely sold out of that lace (not really that unexpected, sadly). Good news, one of the salesladies kept looking and looking and finally found a different lace motif made by the same producer, with the same colors and silver thread worked through. Hallelujah!
 |
| New lace on the left, original on the right |
We lined the bodice with the silk taffeta, and the skirt with the silk twill. Mom resewed the boning casing out of the taffeta, because using the casing it came with was too thick and showed through. The pattern has you fold the selvages to the center and use them as the casing, but for the silk that didn't work well enough, so we sewed casings and sewed them into the bodice lining. This kept the boning directly on the seam line, rather than to one side and made it lay better. We also ironed the side boning (yes, you can iron featherweight boning!) to make them lay flat. The bust boning we kept curved. We also used fingernail clippers to trim the boning to make the edges smooth and rounded so that no sharp corners would poke through.
 |
Sewing the lining, then undersewing to catch the lining up and make the hem lay flat with the horsehair.
The dress was so massive and heavy at this point that Mom had to hold it while I sewed. |
Sewing in the lining of the bodice meant we had to have our straps figured out. We ended up going with a narrow strip of silk organza done in the style of view B, then I hand appliqued the lace over it and the bodice. A note on sewing that sweetheart neckline: YES you have to clip allllll the way down to the point or it won't turn well and will look dowdy. That's what all the staystitching is for. God that was terrifying to cut!
After the dress was all in one piece, we still had to handstitch down the interior lining, applique the lace to the straps and sew on all the buttons. We were about a week and a half out from the wedding at this point, talk about crunch time. Somehow, it all happened.
 |
| Mom hard at work stitching up the lining to the seams to make the skirt hang better |
 |
| Look at all that gorgeous lace! |
 |
| Sewing on the wedding buttons, one by one. Luckily, there were only 21. |
 |
| Oh my god, it's a dress! |
The Wedding Day
You thought we were done, didn't you? Nope, one last sewing thing happened. As I was helping D put the dress on, the upper button loop... stretched. A lot. It was hanging nearly an inch wide!!! WTF? Luckily, I was expecting to do some sewing and had brought needle and thread and pins etc and basically sewed D into her wedding dress :D. It worked! And later in the evening, after I took the stitches out, the button loop had gone back to its proper length and everything held up even through the dancing. Phew.
 |
| Not the only bride to ever be sewn into her wedding dress! |
The whole experience was exhausting and exhilarating, but it was so worth it for the joy in D's face at how beautiful her dress was and how well it fit her. She told us it made her feel beautiful too. Dearest, you have always been so very beautiful, but I'm so glad we could give you confidence and joy in your beauty on your wedding day. Mazel tov!
It's finally over. Both Mom and I took a weeklong vacation to the mountains (separate places in the mountains. We love each other lots but that was a lot of togetherness!!). I've finally caught up on sleep and am ready to sew something for myself next!!!
Finally, a huge thank you to my husband, for being a super supportive spouse who made sure I ate and slept and was so very encouraging the whole way through. Also, he took some absolutely beautiful pictures of the wedding: